> ## Documentation Index
> Fetch the complete documentation index at: https://docs.rxresu.me/llms.txt
> Use this file to discover all available pages before exploring further.
# Prepare your first application
> Save a role, add real experience, check your evidence and prepare an answer for your first application workspace.
By the end of this tutorial, you will have one saved job, one reusable story and an answer ready to review for the employer's form.
Use a real role you are interested in and a project you can describe from your own experience. You need an account and, for AI drafting, a [connected AI provider](/guides/using-ai). You can write the answer yourself if you do not use AI.
## 1. Save the job
Open **Applications** and add an application. Paste the job link or posting text, review the company and role, then save it at **Saved**. See [Adding an application](/guides/adding-an-application) for the import options.
Open the application's details and select **Open workspace**. The workspace brings together that job's posting, next step, notes, documents and seven tabs. You can switch tabs whenever you need to.
## 2. Add one fact you can support
Open **Career → Knowledge → Facts**. In the fact input, write one concrete thing you did. Choose its type and select **Add**.
For example, a fictional applicant could write:
> I interviewed 18 new customers, identified three problems in setup, and worked with design and engineering to shorten the setup flow.
Use your own details. If you do not know the outcome, describe the work without inventing a number. Your new fact can be reused across applications.
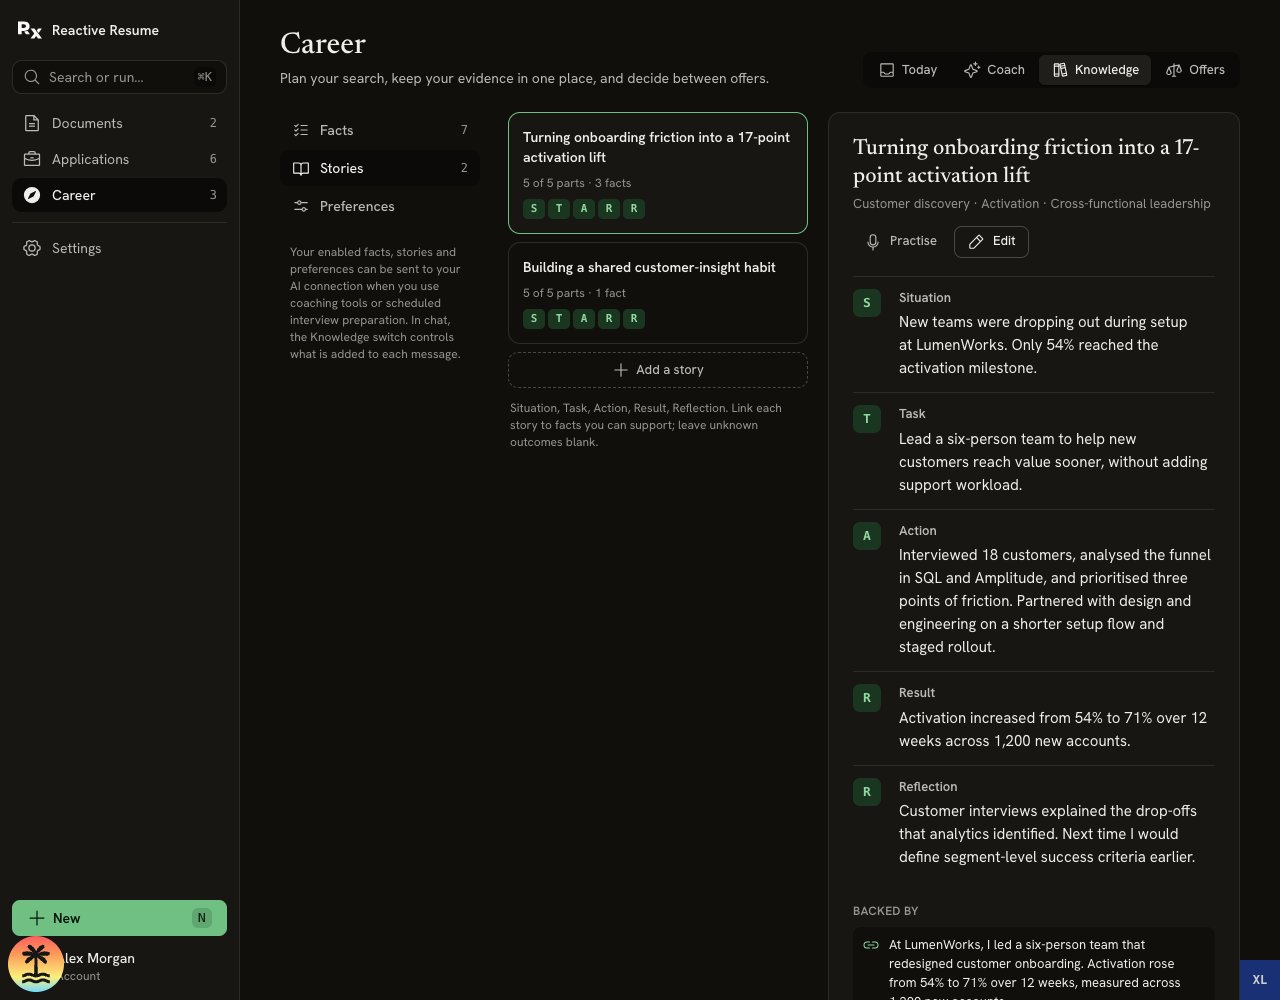
## 3. Turn the experience into a story
In **Knowledge → Stories**, select **Add a story**. Give it a title you will recognize, then write:
1. **Situation:** What was happening?
2. **Task:** What were you responsible for?
3. **Action:** What did you personally do?
4. **Result:** What changed, if you can support it?
5. **Reflection:** What did you learn or what would you do differently?
Select your fact under **Backed by**, then choose **Save story**. Situation, Task and Action are required. Result and Reflection can stay blank.
 ## 4. Check the role against your evidence
Return to the application's workspace and select **Fit → Check fit**.
Read the requirements and their evidence. Find one supported requirement and one that is partly supported or has no evidence yet. If you have relevant experience that you have not recorded, add it. If you have not done it, keep the gap visible.
Choose one useful question to ask the recruiter. For example: “Does this role work mainly with small businesses or enterprise customers?” [Checking job fit](/guides/checking-job-fit) explains the table.
## 5. Prepare one form answer
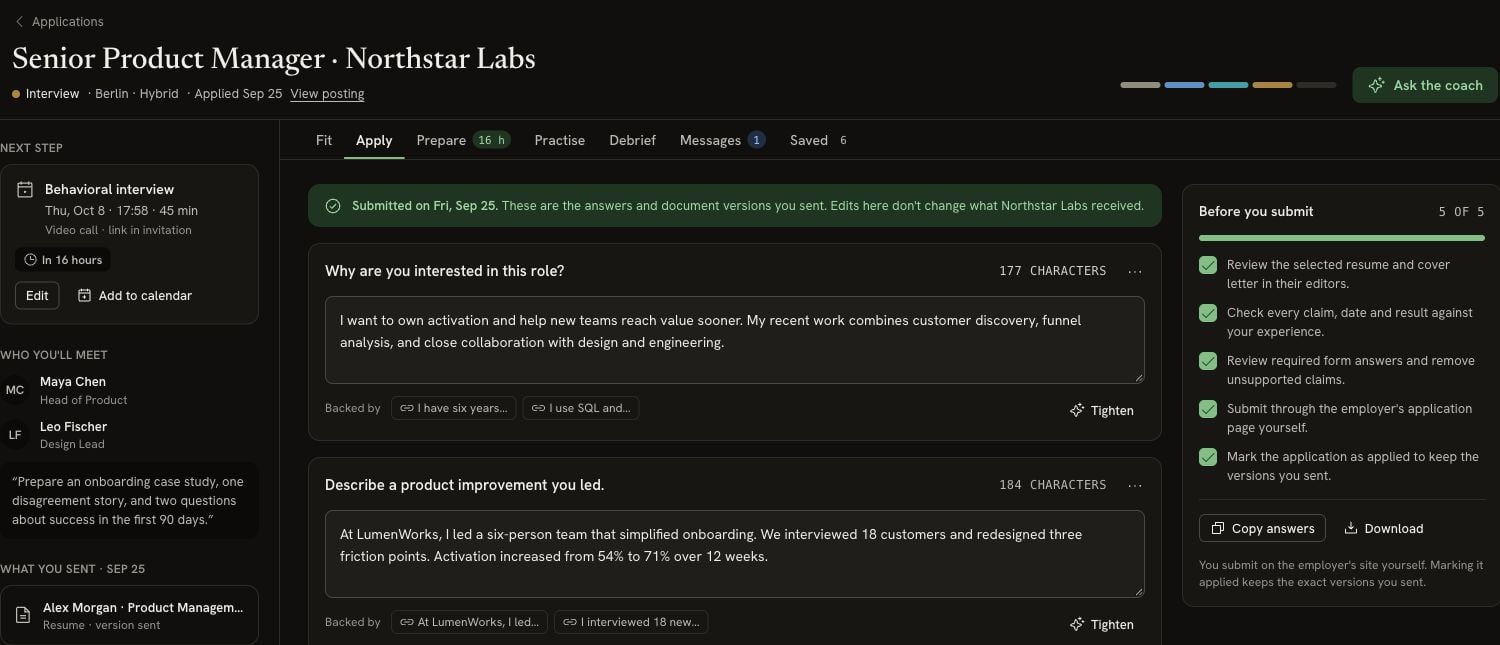
Open **Apply** and select **Add a question from the form**. Paste the employer's question, including any word or character limit, and finish editing the question.
Select **Draft**. Review the proposed answer and its supporting facts. Choose **Accept** if it is accurate, or **Skip** and write your own answer. Change anything that does not sound like you.
Select the count beside the question to switch between words and characters. Check the final answer against the employer's limit.
## 4. Check the role against your evidence
Return to the application's workspace and select **Fit → Check fit**.
Read the requirements and their evidence. Find one supported requirement and one that is partly supported or has no evidence yet. If you have relevant experience that you have not recorded, add it. If you have not done it, keep the gap visible.
Choose one useful question to ask the recruiter. For example: “Does this role work mainly with small businesses or enterprise customers?” [Checking job fit](/guides/checking-job-fit) explains the table.
## 5. Prepare one form answer
Open **Apply** and select **Add a question from the form**. Paste the employer's question, including any word or character limit, and finish editing the question.
Select **Draft**. Review the proposed answer and its supporting facts. Choose **Accept** if it is accurate, or **Skip** and write your own answer. Change anything that does not sound like you.
Select the count beside the question to switch between words and characters. Check the final answer against the employer's limit.
 ## 6. Review before submitting
Use **Before you submit** to check your resume, letter and answers. Link the documents you intend to send; [Tailoring a resume for a job](/guides/tailoring-a-resume-for-a-job) explains how to prepare them.
Copy your answers into the employer's form and submit there yourself. Only after submitting, select **Mark as applied** in **Apply**. This records the application and keeps a saved copy of your answers and the linked document versions.
If you are still practising this tutorial, leave the application at **Saved**. You do not need to submit anything to learn the workspace.
## What you now have
Your project is in shared Knowledge, ready for another job. This application's answers and documents stay with the job. When an interview arrives, [prepare for the round and rehearse an answer](/guides/preparing-for-interview-day) using the same experience.
This documentation is built and hosted on [Mintlify](https://mintlify.com), a developer documentation platform.
## 6. Review before submitting
Use **Before you submit** to check your resume, letter and answers. Link the documents you intend to send; [Tailoring a resume for a job](/guides/tailoring-a-resume-for-a-job) explains how to prepare them.
Copy your answers into the employer's form and submit there yourself. Only after submitting, select **Mark as applied** in **Apply**. This records the application and keeps a saved copy of your answers and the linked document versions.
If you are still practising this tutorial, leave the application at **Saved**. You do not need to submit anything to learn the workspace.
## What you now have
Your project is in shared Knowledge, ready for another job. This application's answers and documents stay with the job. When an interview arrives, [prepare for the round and rehearse an answer](/guides/preparing-for-interview-day) using the same experience.
This documentation is built and hosted on [Mintlify](https://mintlify.com), a developer documentation platform.