> ## Documentation Index
> Fetch the complete documentation index at: https://docs.rxresu.me/llms.txt
> Use this file to discover all available pages before exploring further.
# Moving items between sections
> Learn how to move resume items from one section to another, or to a different page, to better organize your content and split lengthy sections across multiple pages.
If you have a long work history or extensive project list, you may want to split items across multiple pages or reorganize them into different sections. The **Move to** feature lets you do exactly that—quickly relocate any item to another section or page with just a few clicks.
## Why move items?
* **Split lengthy sections**: If your Experience section spans more than one page, you can move older roles to a custom section on page 2.
* **Reorganize content**: Move a project from "Projects" to a custom "Open Source" section, or relocate a skill to a different grouping.
* **Fine-tune page layout**: Control exactly which items appear on which page for a polished, balanced resume.
## How to move an item
Navigate to your resume and open it in the builder.
Make sure you have at least one item in a section (e.g., an experience entry, project, or skill) before proceeding.
In the left sidebar, find the section containing the item you want to relocate. Click on the section to expand it and view all items.
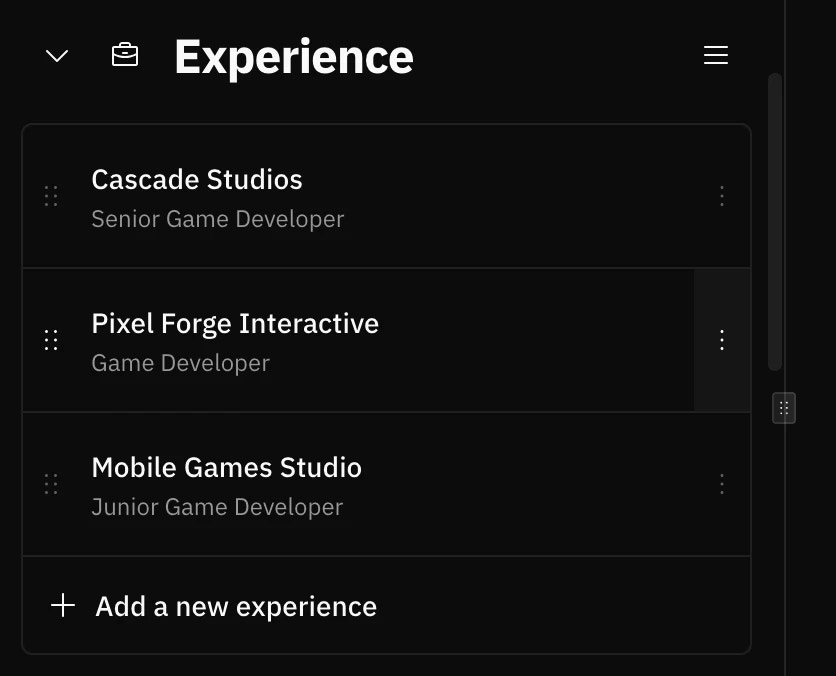 Each item has a **dropdown menu** (three-dot icon or chevron) on the right side. Click this icon to reveal the available actions.
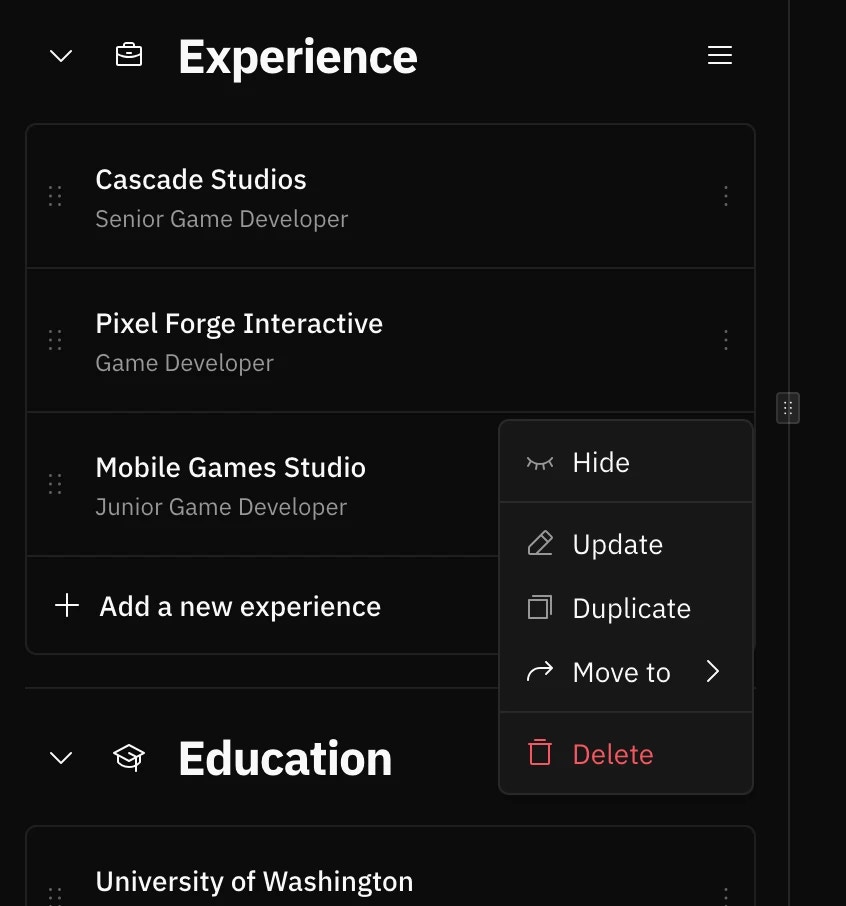 In the dropdown menu, hover over or click the Move to option. This will open a submenu showing all
available destinations.
The submenu displays available destinations organized by:
* **Existing sections** of the same type (e.g., other Experience sections)
* **Pages** where you can place the item
* **Custom sections** if any exist
Click on your desired destination to move the item there.
In the dropdown menu, hover over or click the Move to option. This will open a submenu showing all
available destinations.
The submenu displays available destinations organized by:
* **Existing sections** of the same type (e.g., other Experience sections)
* **Pages** where you can place the item
* **Custom sections** if any exist
Click on your desired destination to move the item there.
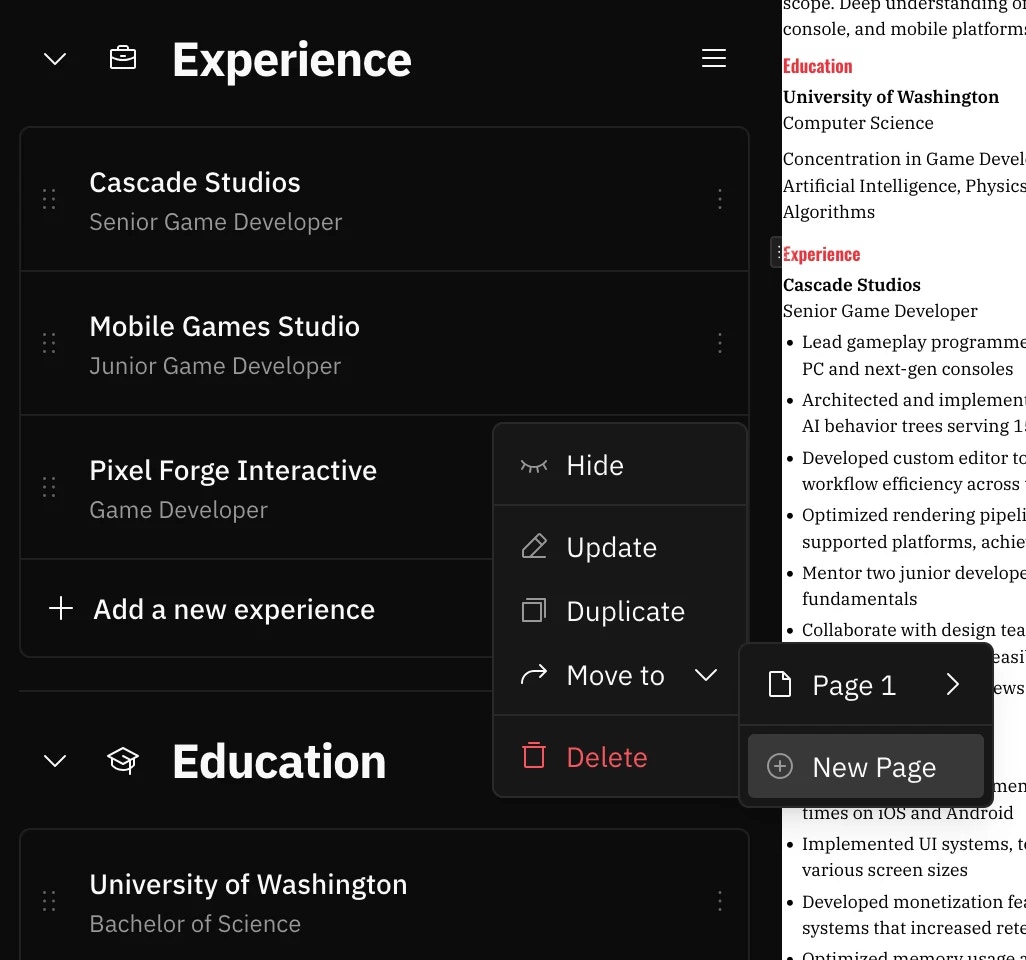 If a custom section of the same type doesn't exist on your target page, Reactive Resume will **automatically create one** for you. This makes it easy to split sections across pages without manual setup.
After selecting a destination, the item will be moved immediately. You can verify by:
* Checking the destination section in the left sidebar
* Looking at the resume preview to see where the item now appears
If a custom section of the same type doesn't exist on your target page, Reactive Resume will **automatically create one** for you. This makes it easy to split sections across pages without manual setup.
After selecting a destination, the item will be moved immediately. You can verify by:
* Checking the destination section in the left sidebar
* Looking at the resume preview to see where the item now appears
 ## Example: Splitting Work Experience across pages
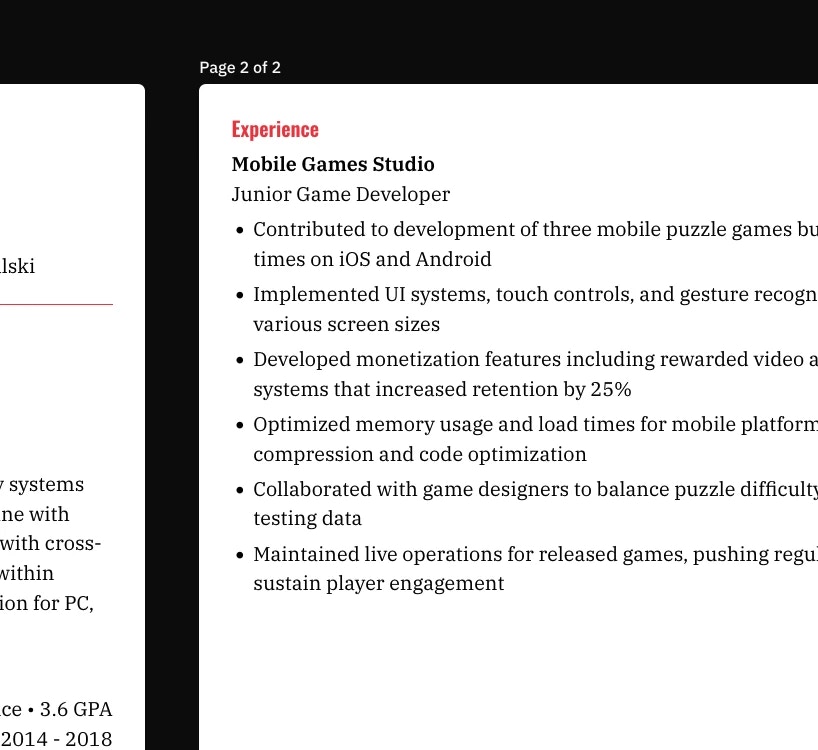
A common use case is when your work history is too long to fit on a single page. Here's how to handle it:
Review your Experience section and decide which roles should appear on page 1 (typically your most recent and relevant positions) and which can go on page 2.
For each older position you want to relocate:
1. Open the item's dropdown menu
2. Click Move to
3. Select **Page 2** (or the appropriate page)
If no Experience section exists on page 2, a new custom section will be created automatically with the same type, so your formatting stays consistent.
Check the resume preview to ensure:
* Page 1 contains your most important, recent roles
* Page 2 continues with your earlier experience
* The section headings and styling remain consistent
## Tips for organizing multi-page resumes
**Keep it logical**: Maintain chronological order within each page. Move complete job entries rather than splitting a
single role across pages.
**Use custom section names**: After moving items to a new custom section, you can rename it (e.g., "Earlier
Experience" or "Additional Projects") to provide context for recruiters.
Moving items reorganizes your content but doesn't affect the data itself. You can always move items back or to
different sections as needed.
## Troubleshooting
### I don't see the "Move to" option
Make sure you're clicking the dropdown menu on a **section item** (like an individual job or project), not the section header itself. The Move to feature is only available for items within sections.
### The destination I want isn't listed
The Move to submenu shows destinations compatible with the item type. For example, an Experience item can only be moved to other Experience-type sections. If you need to change an item's type entirely, you may need to recreate it in the desired section.
### My custom section wasn't created
If you're moving to a page that already has a section of the same type, the item will be added to that existing section rather than creating a new one. This is by design to avoid duplicate sections.
## Example: Splitting Work Experience across pages
A common use case is when your work history is too long to fit on a single page. Here's how to handle it:
Review your Experience section and decide which roles should appear on page 1 (typically your most recent and relevant positions) and which can go on page 2.
For each older position you want to relocate:
1. Open the item's dropdown menu
2. Click Move to
3. Select **Page 2** (or the appropriate page)
If no Experience section exists on page 2, a new custom section will be created automatically with the same type, so your formatting stays consistent.
Check the resume preview to ensure:
* Page 1 contains your most important, recent roles
* Page 2 continues with your earlier experience
* The section headings and styling remain consistent
## Tips for organizing multi-page resumes
**Keep it logical**: Maintain chronological order within each page. Move complete job entries rather than splitting a
single role across pages.
**Use custom section names**: After moving items to a new custom section, you can rename it (e.g., "Earlier
Experience" or "Additional Projects") to provide context for recruiters.
Moving items reorganizes your content but doesn't affect the data itself. You can always move items back or to
different sections as needed.
## Troubleshooting
### I don't see the "Move to" option
Make sure you're clicking the dropdown menu on a **section item** (like an individual job or project), not the section header itself. The Move to feature is only available for items within sections.
### The destination I want isn't listed
The Move to submenu shows destinations compatible with the item type. For example, an Experience item can only be moved to other Experience-type sections. If you need to change an item's type entirely, you may need to recreate it in the desired section.
### My custom section wasn't created
If you're moving to a page that already has a section of the same type, the item will be added to that existing section rather than creating a new one. This is by design to avoid duplicate sections.