Use Check mode to see how well software reads your resume, fix issues pinned to their lines, match a job posting and review your wording.
Before you send a resume, open Check in the editor. It shows how reliably an applicant tracking system (ATS) can read your resume, pins each problem to the line it’s about, and compares your resume with a job posting. Everything except the optional writing review runs in your browser.
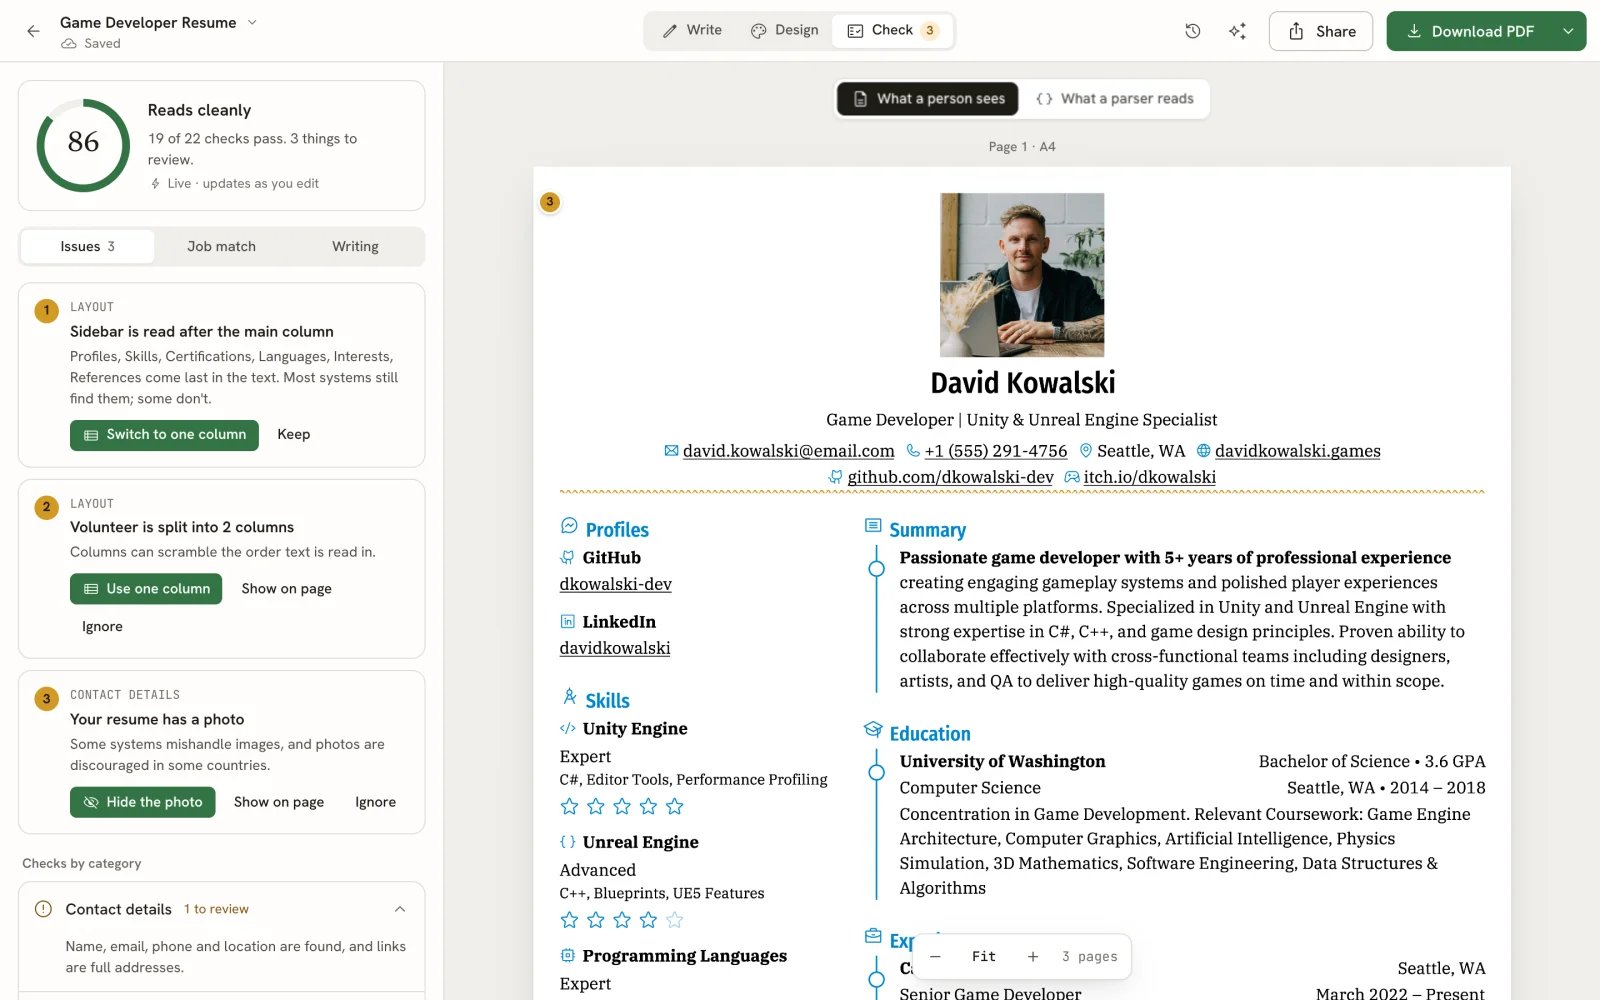
Check mode: the score and issues on the left, numbered pins on the page
In the editor bar, select Check, or press 3 when you aren’t typing in a field. The tab shows how many issues are open, or a check mark when there are none.Check updates as you edit. Switch to Write, change something, and the score and issues follow straight away.
The panel starts with a score from 0 to 100 and a short verdict: Reads cleanly (80 and above), Mostly readable (50 to 79) or Hard for software to read (below 50).
The score, what it counts, and the first issue card
The score is the share of checks your resume passes, for example 19 of 22 checks pass. There are 22 checks, grouped into five categories:
Category
What it looks at
Contact details
Your name, email, phone and location are there, email and links are in a form software recognises, and whether a photo is showing.
Dates
Every experience and education entry has dates, in a form software reads, that don’t run backwards or start in the future.
Layout
Every section with entries is placed on a page, text reads in order (sidebars, multi-column sections), and body text size, line height and page margins aren’t too small.
Section headings
Headings are ones software looks for, such as Experience, Education and Skills, and some work history shows.
Writing
Every role describes what you did.
The heading check only runs when your resume’s language is English, so resumes in other languages have 21 checks.
The score measures how reliably software can read your resume. It doesn’t predict whether you’ll be shortlisted.
Below the issues, Checks by category lists each category with how many checks pass, or how many need a look. Select a row to read what it covers.
Checks by category, with the exported PDF check below
The Issues tab lists every open issue as a numbered card, most serious first. Each card names its category, says what’s wrong in plain words, and offers a fix.
1
Find the issue on the page
Each issue about a specific part of your resume has a matching numbered pin in the page margin, with a wavy underline under that part. Select a card, or its Show on page button, to outline the line on the page and scroll to it. Select a pin on the page to jump to its card.
Issue 2 selected: its pin and outline on the page
2
Apply the fix
Many issues fix in one step. The card’s main button says what it does, for example Hide the photo, Use one column, Switch to one column or Use the standard heading. A message confirms the change and offers Undo.Other issues need you to write something, such as a missing phone number or a role with no description. Their button, for example Add a phone number or Describe the role, switches to Write and opens the right field.
3
Or set the issue aside
If an issue doesn’t apply to you, select Ignore. For a choice that is yours to make, such as a two-column design, the button reads Keep instead. Ignored issues no longer count against the score. To bring them back, select Show them again under the list.
When every check passes, the tab reads Nothing to fix.
On a phone, selecting a pin opens a bar at the top of the page that reads “Issue 1 of 3”. Use the arrows to step
through the issues and fix each one from the card at the bottom, without leaving the page.
At the top of the page, switch from What a person sees to What a parser reads. The page is replaced by the text software pulls out of your resume’s PDF, in the order it comes out, with the name, email, phone, location, links, section headings and dates it recognised.
What a parser reads. On this two-column resume, the location was picked up from the wrong line
Use it to spot content that lands in the wrong place, for example a sidebar read after your experience, or a field picked up from the wrong line. Switch back with What a person sees.
The Job match tab picks out the terms a job posting stresses and shows which ones your resume already has. It isn’t part of the score.
1
Give it a posting
If the resume is linked to an application that has a saved posting, Job match uses that posting. If the linked application has no posting yet, paste it into the box and select Save to the application. Otherwise, choose an application from the list, or paste the posting into the box and select Match this posting.A pasted posting is kept for this visit only. To keep it, select Save as application…, enter the Company and Role, and select Save and link. This creates an application and links the resume to it.
2
Review the terms
The tab shows how many posting terms appear, for example 19 of 25 posting terms appear. Terms under Not in your resume · add only if true are missing. Terms under Already covered are there already: select one to highlight where it appears on the page.
3
Add a missing term, if it's true
Select a missing term to see how often the posting uses it, then choose:
Add to Skills to add it as a keyword on your first visible skill, which the button names (for example Add to Skills · Unity Engine). If you have no skills, it creates one.
Ask the assistant to work it in to open the Assistant, which asks you before it adds anything.
Not true for me, hide it to leave it out of the match. Hidden terms are listed under the tab with Show again.
Job match with a pasted posting and a missing term selected
Once a resume is linked, the top of the tab names the application. Select Change to link a different application or to unlink it.
The checks above read your resume’s content and settings. To test the actual file a recruiter receives, select Also check the exported PDF at the bottom of the Issues tab. Reactive Resume creates the PDF in your browser and runs the full file check on it, the same one the ATS checker uses. Nothing is uploaded.A message tells you whether the PDF reads cleanly or how many more things there are to look at. Anything it finds is pinned to the page with a PDF icon and a dashed outline.
A pin from the exported PDF check
Select Show in the message, or any PDF pin, to open the full report. It gives a score out of 100, a score for each category (Readability, Layout, Sections, Contact details, Dates), and each finding with what to do about it. Writing holds tips that don’t affect the score.
The exported PDF report
The pins show while the Issues tab is open, until you change the resume. After an edit, run the check again.
The checks are mechanical. The Writing tab asks an AI model how a reader might react to your summary and bullets, and suggests rewrites. It needs your own AI provider; see Connecting an AI provider. Without one, the tab offers Open AI settings. Issues and Job match work without AI.
1
Choose the model
The tab says where your resume’s text goes, for example “Sends your resume’s text only to OpenAI · gpt-5-mini, with your key.” To use another of your providers, select Change and pick it.
2
Run the review
Select Review writing. The review reads up to 120 bullets and paragraphs.
3
Accept or reject the suggestions
Rewrites of your own bullets appear as Proposed edits, numbered in the page margin. Select Accept or Reject on each, or Accept all. With an edit focused, A accepts it, R rejects it, and ↑↓ move between edits.Advice that isn’t a rewrite appears as a note marked High, Medium or Low, with Show on page. What’s working lists your strengths. Select Run again for a fresh review.
A model’s opinion can be wrong, and the review never changes the score. Accept only the rewrites that are true to your
experience.