

Before you start
Connect an AI provider with your own API key. See Connecting an AI provider. If you open the assistant before connecting one, it offers to connect one on the spot.Open the assistant
In the editor, select Assistant (the sparkle button) in the editor bar, just before Share, or press ⌘ J (Ctrl J on Windows and Linux). Press it again, or select Close the assistant (×) in the panel, to close it.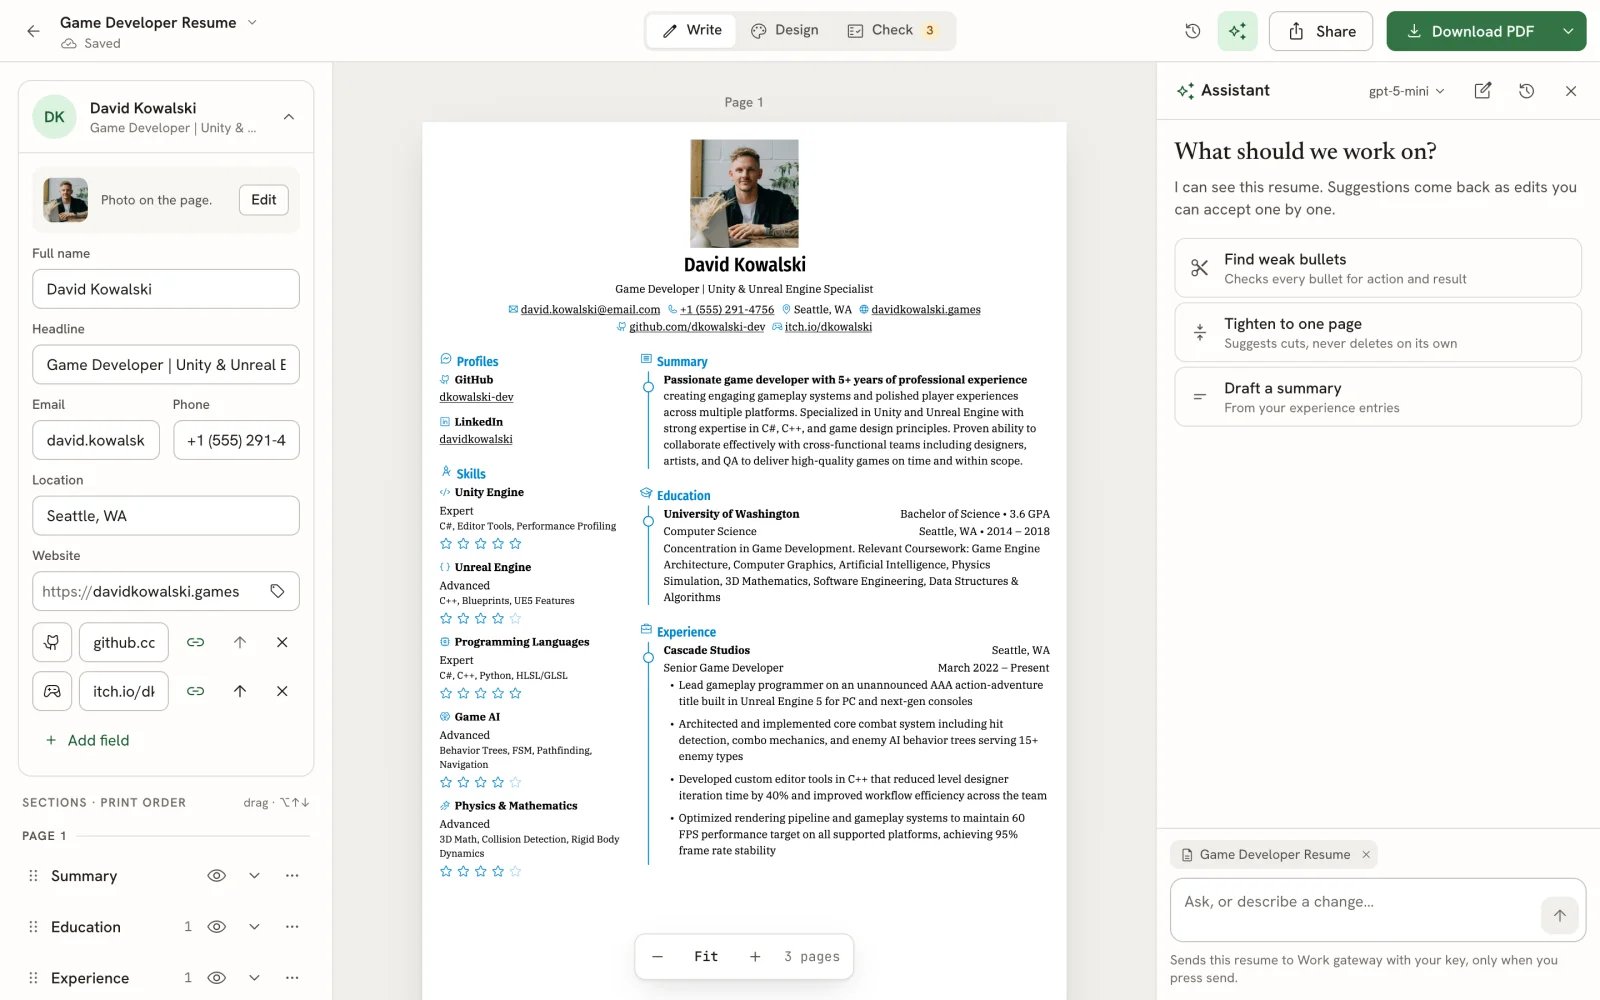
The assistant beside a resume, ready for a first request
- In the command bar (⌘ K), type a question and choose Ask the assistant. Outside the editor, this opens the document you edited last and sends the question there. See Using the command bar.
Ask for a change
1
Pick a suggestion or write your own
A new conversation starts with a few suggestions, such as Find weak bullets, Tighten to one page and Draft a summary for a resume, or Make the opening stronger and Make it shorter for a letter. When the document is linked to an application, Tailor to the … posting appears first.Or type in the box (Ask, or describe a change…) and press Enter. Use Shift Enter for a new line.
2
Let it read and reply
The assistant reads your document, then answers in a sentence or two and shows its suggestions as a set of proposed edits. You can keep editing your document while it works.
Review proposed edits
Each proposed edit shows where it lands (for example, Summary · paragraph 1), the current text struck through, the new text highlighted, and a short reason. The same change is marked on the page, and the section shows a proposed badge, so you can read it in place.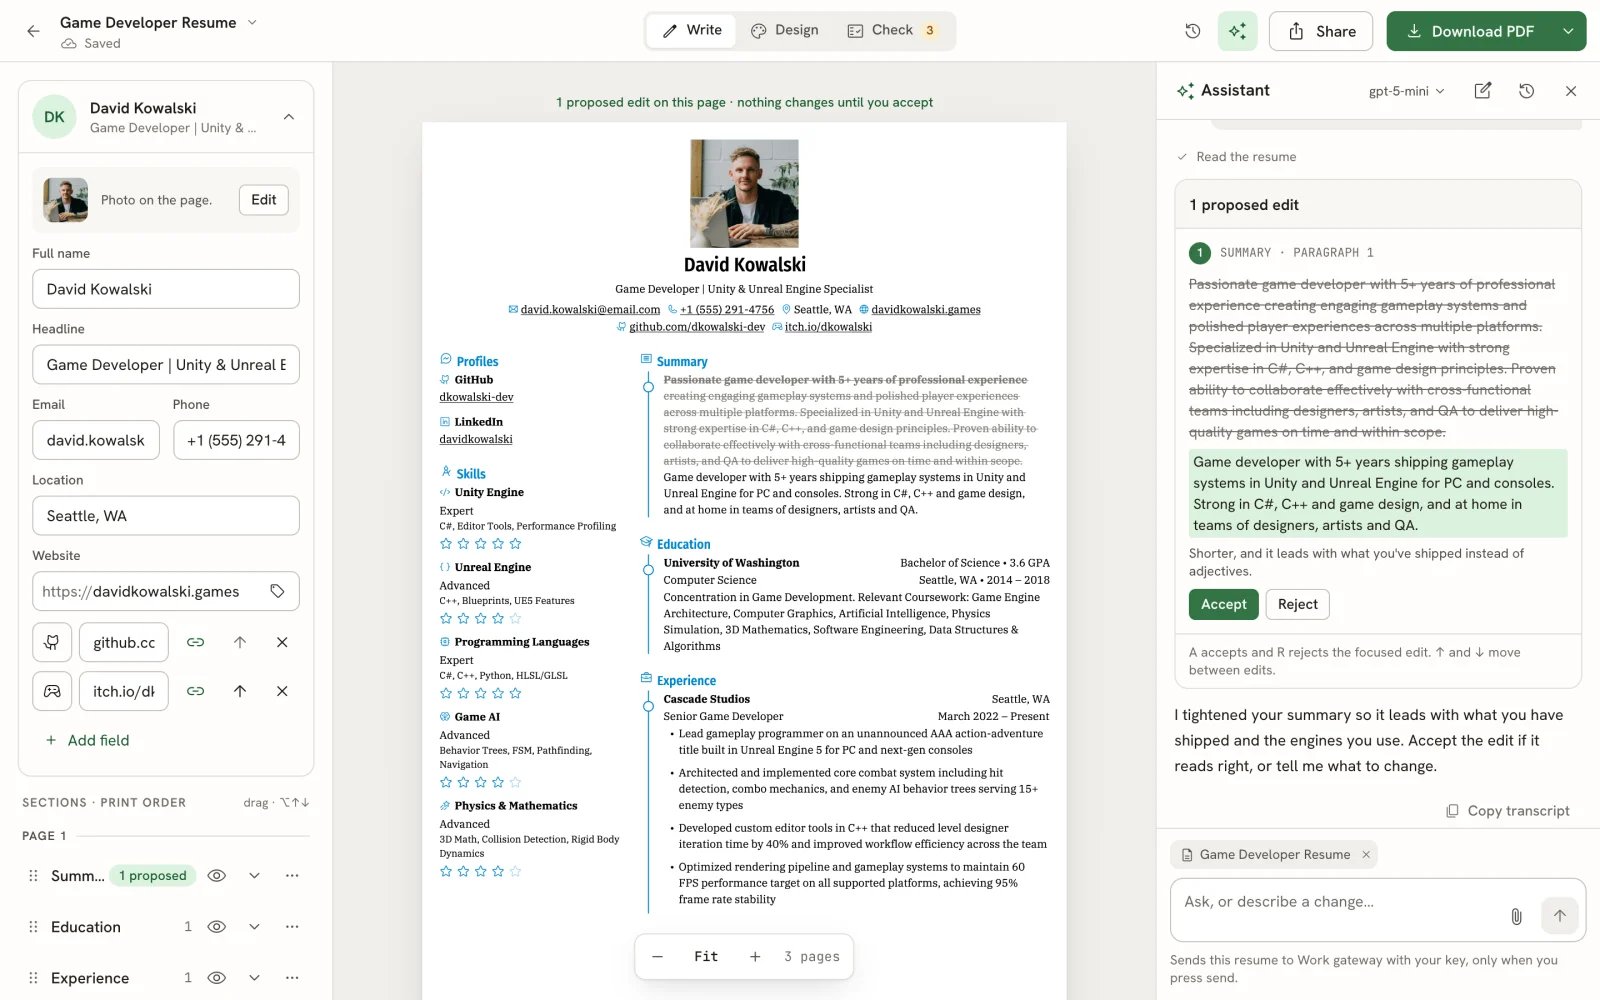
A proposed edit, shown on the page and in the assistant
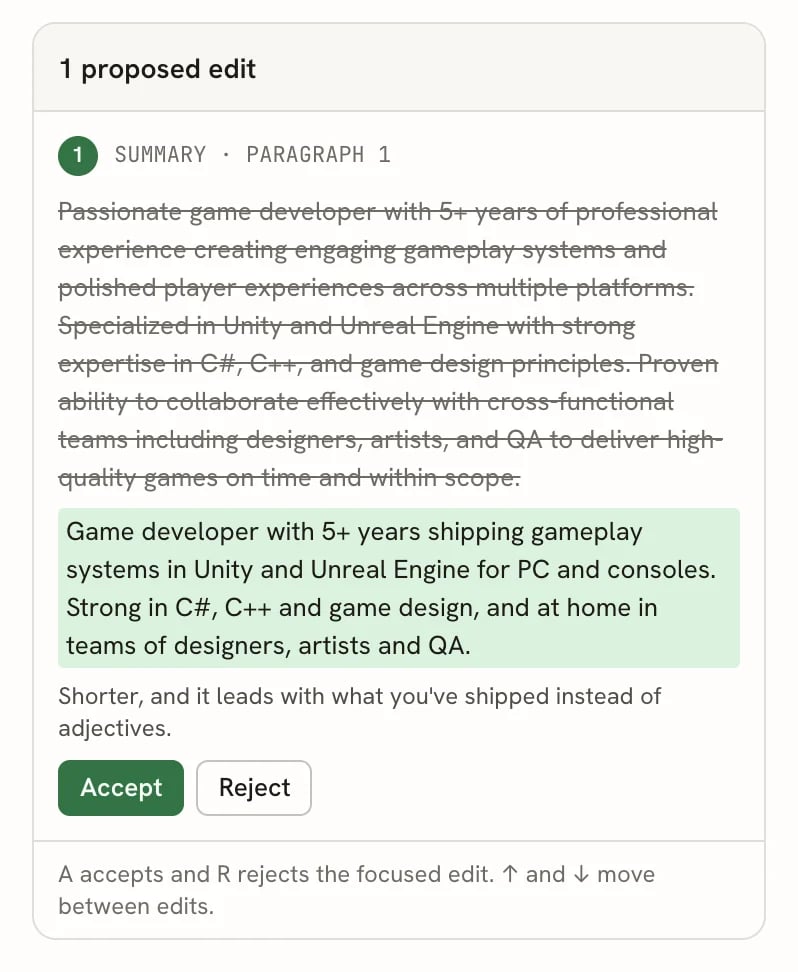
The proposed edit card
- Select Accept to apply an edit, or Reject to dismiss it.
- When a set has more than one edit waiting, Accept all applies them together.
- With an edit focused, press A to accept, R to reject, and ↑ ↓ to move between edits.
Undo an accepted edit
Accepting shows a toast, Edit applied, with Undo. You can also press ⌘ Z (Ctrl Z) like any other change, or restore an earlier version from History. An edit you undo becomes pending again in the conversation, so you can accept it later. See Undoing changes and version history.Answer a question
When the assistant needs a fact or a choice from you, it shows a blue question card with a few answers. Select one, or type your own under Or in your own words… and select Send. The assistant then continues with your answer.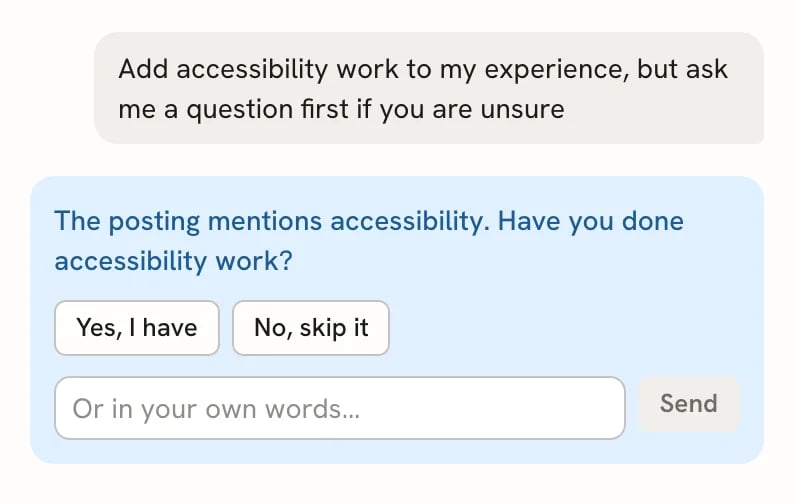
A clarifying question from the assistant
Choose what’s shared with each message
Above the message box, chips show what goes with your next message: the document, and the job posting when the document is linked to an application. Select the × on a chip to leave it out, including before your first message. Without the document, the assistant can’t read or edit it for that message. The line under the box always says what will be sent and to which provider, and nothing is sent until you press send. When you select Prepare from an application’s detail panel, the assistant uses that application’s posting, even when several applications share the same resume.Attach files
Select the paperclip in the message box to attach files, such as a job description PDF or your notes. You can attach them before your first message or later in the conversation. Each file shows as a chip; select its × to remove it before sending.- Plain text, Markdown and JSON files are read as text (up to the first 40,000 characters).
- Images, PDFs and MP3 or WAV audio are passed to the model directly. Whether the model can use them depends on your provider.
- Other file types are attached but not read. Paste the relevant text instead.
- You can attach up to 10 files per message, each up to 25 MB, 100 MB per conversation and 1 GB across all your conversations.
Attachments work with local, S3-compatible or Vercel Blob storage and stay private. If you use a reverse proxy, allow
request bodies of at least 50 MB: files travel base64-encoded, which makes them about a third larger.
Search the web
If you connect an optional Web access service in Integrations, the assistant uses that selected service for search and enhanced reading. If your installation’s administrator set up server search, the assistant searches with it instead, with or without a connection. Web access then says Your server provides search for Applications and the assistant, and, until you connect a service, Test search checks it. Without a connection, the assistant can read supplied public URLs with the built-in reader or work from text you paste. See Assistant tools. You can also supply a public page URL: the assistant uses the selected reader or built-in reading. Page reading does not require a separate search account. Failed reading leads to pasted-text recovery; clipped or incomplete pages are identified before you rely on them. The conversation shows search/read progress, failures and retrieved Sources. Sources remain visible after reopening the conversation. A failed search keeps your conversation and does not silently switch paid providers.Switch models
The model chip in the assistant’s header shows the model in use. Select it to switch to another connected provider for this conversation, or choose Connect another… to add one in settings.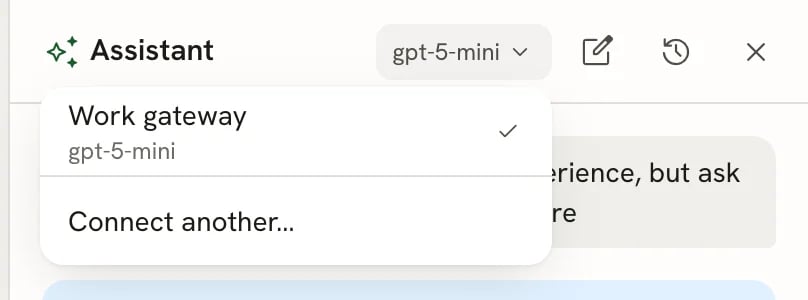
The model menu
Stop, retry or copy a conversation
- Stop a reply with the stop button that replaces send while the assistant is working, or press Esc in the message box. If it stopped before proposing anything, you’ll see Stopped. No edits were proposed. with Continue.
- When the provider returns an error, your message is kept. Select Retry, or Switch model to try another provider.
- Copy transcript at the end of the conversation copies the messages as plain text, speaker by speaker, without the tool steps, and includes the retrieved source links.
Past conversations
Each conversation belongs to one document. Opening the assistant continues that document’s latest conversation. Select New conversation (the pencil) to start fresh, or Past conversations (the clock) to see earlier ones.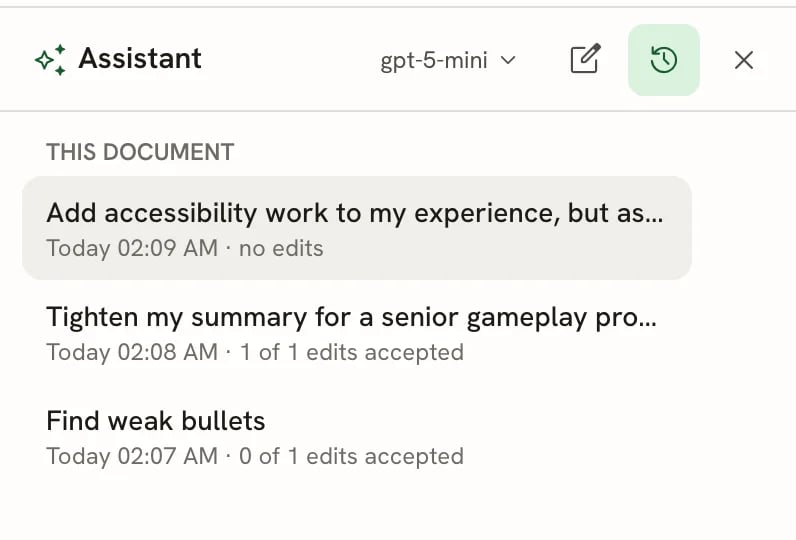
Past conversations for this document
Replies stream while the conversation is open. On instances without Redis (some self-hosted setups), a reply that’s
still running when you reload the page can’t be picked up again; its finished messages are still saved.
Related guides
Connecting an AI provider
Add, test and manage the providers the assistant uses.
Assistant tools
Everything the assistant can read and do.
Tailoring a resume for a job
Link a resume to an application so the assistant sees the posting.
Writing a cover letter
Use the assistant on letters, too.